In this post , You will find below the steps to fix Microsoft Excel not responding issue.
Solution 1. Try to Change the Default Printer
Sometimes Microsoft Excel can’t work properly due to Printer issue. If it’s not responding with the default printer, here is what you can do to change it.
- Open your Settings and look for “Printers & Scanners.”
- You will be moved to the next screen from where you can select the “Printer & Scanners” option.
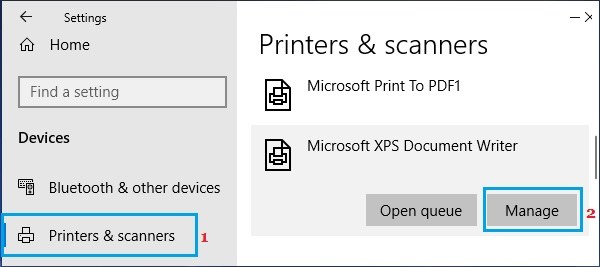
- Now click Microsoft XPS Document Writer and hit the “Manage” option.
- You can now click the “Set as Default” option. Once you are done completing the steps, open Excel again and check if it’s working or not.
Solution 2: Try Running Excel into Safe Mode
If your Microsoft Excel is not responding after the update of Windows 10 or your spreadsheet is stuck, try to run Excel into safe mode. To do so follow the steps given below:
- Press Windows + R key
- Type excel.exe /safe
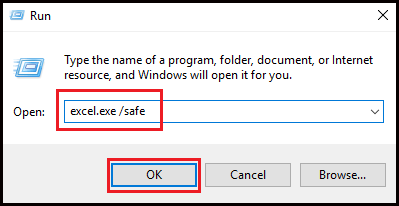
- Click OK to start the MS Excel program into Safe Mode.
- Now open the Excel file that is not responding
This solution can help you to fix Excel not working Windows 10 issue.
Solution 3: Try Disabling Add-Ins
Try disabling Add-Ins, if you are suffering regular slowdowns of MS Excel not responding, getting stuck or freezing on your PC. Follow the steps to disable the add-ins:
- Press Windows + R key
- Type excel.exe /safe
- Click OK to start the MS Excel program
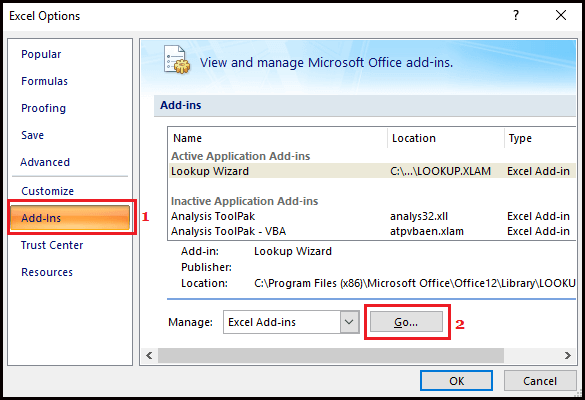
- Once in MS Excel, click on file icon on the top left corner on the screen and click on the Excel Options button
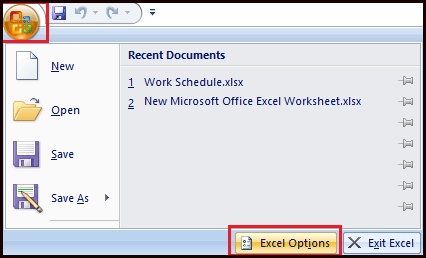
- Now, click on the Add-ins option in the side menu.
- Select the Excel Add-ins and click on go button to access the Add-Ins selection screen.
- On the Add-Ins screen, disable all the Add-Ins on your PC by uncheck the box next to the active Add-Ins
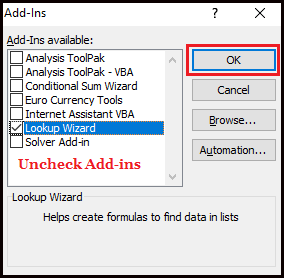
- Click OK to save the Settings
After disabling the Add-Ins, restart the Microsoft Excel on your system and check whether the problem of Microsoft Excel Not responding or working after Windows 10 update.
Solution 4: Repair the Microsoft Office
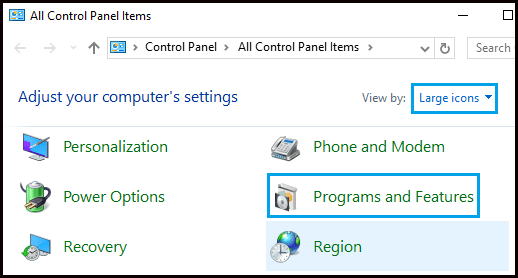
- Click on Windows icon, scroll down and click on the Windows System.
- Tap to the Control Panel option in Windows System Folder

- Hit the Program and Features in the control panel
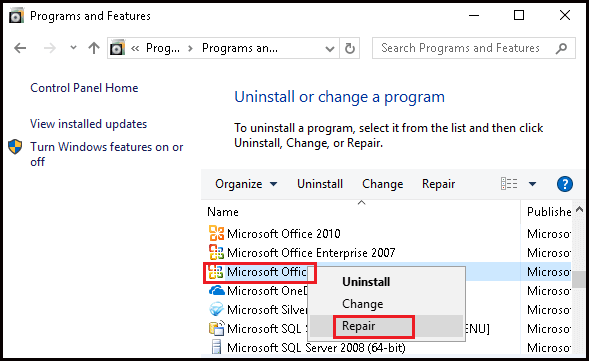
- Now, right-click on the MS Office and Click on Repair option in the menu
Solution 5: Try Disabling Hardware Graphic Acceleration
Try disabling the Hardware Graphic Acceleration to Let MS Excel work after Windows 10 upgradation, follow the steps to do so:
- Open MS Excel
- Go to the File -> Options
- Click on the Advanced tab -> Display
- Check the box that says ‘Disable Hardware Graphic Acceleration’

- Click OK and restart the MS Excel.
Solution 6: Fix the issue with Protected View
Follow the steps to solve the issue of MS Excel not working after Windows 10 update with the help of protective view:
- Open MS Excel
- Go to the File ->Options
- Select the Trust Centre ->Trust Centre Settings

- Click on the Protected View
- Uncheck all the options
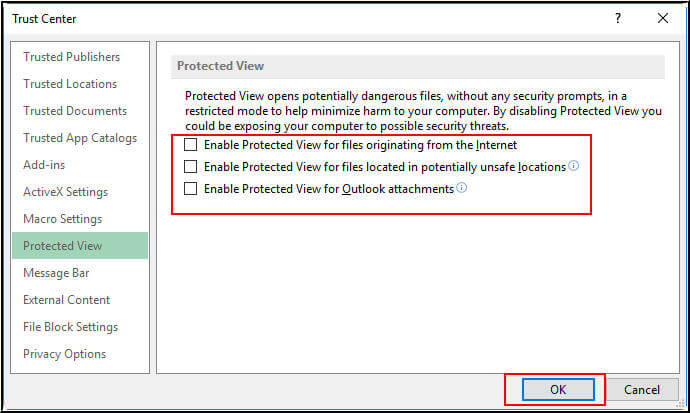
Also, change the below-given settings
- Under the Trust Centre settings,
- Click on the ‘File Block Settings’
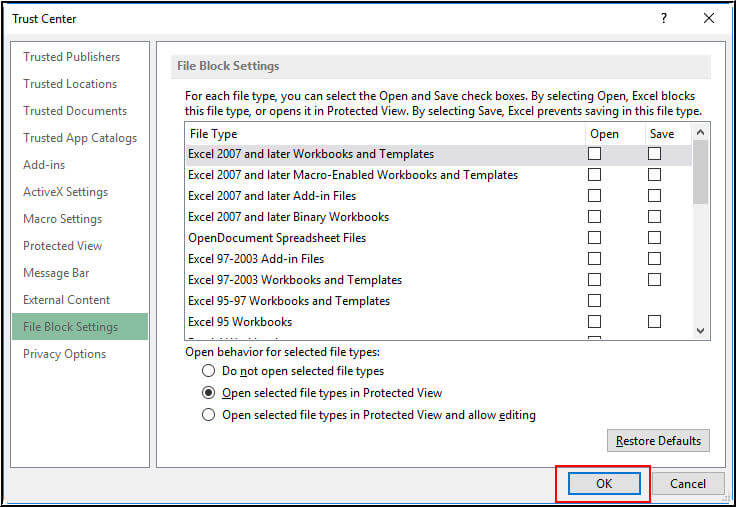
- Uncheck all the options
Conclusion
Microsoft Excel not responding can be face due to various reasons. However, with the above manual methods, you can fix the issue without wasting a minute and resume work, but if the condition is worse and usual methods can’t prove to be any help, you can use Kernel for Excel Repair.
I am Komal Hatwaani, aims to provide readers with informative and engaging content that covers everything from technology and business to entertainment and lifestyle. This website dedicated to delivering high-quality content that informs, entertains, and inspires our readers.
Join us on our journey as we continue to explore the ever-evolving landscape of news and information, providing you with valuable insights and perspectives that enrich your digital experience.


