Experiencing problems with your Canon printer not printing or encountering issues with black color output can be frustrating. However, understanding and troubleshooting steps for these issues can help resolve them effectively.
Here, in this post you can read about if you are facing the problem “Why is my Canon Printer Won’t printer Anything” Like black color, PDF documents, Color Text, after changing the refill, Not printing on Both side page.
Step by step procedure to fix these canon printer problem you will check in the next section.
Diagnosing and Fixing Canon Printer not printing Color anything Issues: Troubleshooting Guide
Solution 1: Set Canon as the default printer – Troubleshooting the Printing Problem
“When attempting to print, your computer typically assigns printing tasks to the default printer, unless manually selecting an alternative. If you haven’t set your printer as the default option for printing or specifically chosen it as the dedicated printer, it may not function properly.”
To set up your Canon printer as the default printer, you can take these steps:
- Simultaneously press the Windows logo key and R on your keyboard to open the Run dialog box.
- Enter ‘control’ in the search field and then press ‘Enter’ to open the Control Panel.

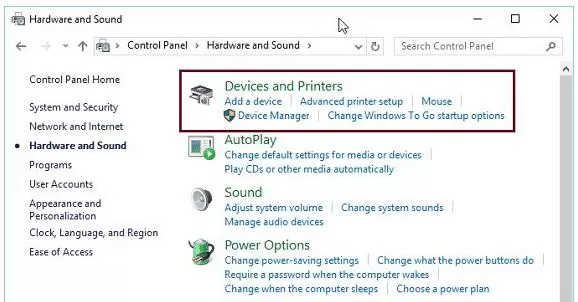
- Select Small icons from the drop-down menu next to View by. Then, click Devices and Printers.

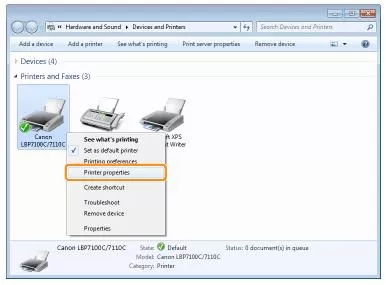
- Right-click your Canon printer and select Set as default printer from the list.

Now perform printing tasks to check if it works or move to next solution for offline problem.
Solution 2: Restart Print Spooler to Fix Canon Printer not printing color Properly
“If you encounter the ‘Canon printer is not printing color text’ message, you can resolve it by restarting the print spooler service. For those unfamiliar with the term, the print spooler is responsible for managing print jobs sent to the printing device.”
- On your system, press the “Windows” key together with the “R” key to open the “Run” dialog box.
- Now, type “services.msc” in “Run” and hit the “Enter” key.

- A window with numerous services will open up. Tap on any service and press the “P” key.
- Continue holding down the key until ‘Print spooler’ gets highlighted.

- Next, you have to right-click on the “Print Spooler” service and select “Properties”.

- Then, go to the “General” tab. Under the “Service status”, find and click the option “Stop” and then press “Ok”.
- Change the “Startup type” of the print spooler to “Automatic” and click “Ok”.

- Again go to the spooler and right click to restart.

- The final step is to reboot your system.
- The “Canon printer is not printing anything” message will have been cleared by now.
Solution 3 : Delete print jobs from the print queue
“If the printer isn’t printing properly, there might be a canceled or failed print job in the print queue. In such instances, you’ll need to delete print jobs from the print queue. Here’s how:”
Delete print jobs from the print queue:
- To display the print job, click Display Print Queue.
- To delete the print jobs, from the Printer menu, select Cancel All Documents.
- When the confirmation message appears, click Yes.
If the print items do not clear, you can try the manual process. After the print jobs are deleted manually, the printer spooler will need to be restarted. Please see below to manually delete print jobs and restart the spooler.
Manual process:
- Press the Windows logo key and R at the same time to open the Run box.
- Type services.msc in the field and press Enter.
- In the Services window, scroll down to the Print Spooler. Right-click it and select Stop.

- After the print spooler service has stopped, press the Windows logo key and R at the same time to open the Run box. Then type spool in the field and press Enter.

- Open the PRINTERS folder.
- Delete any files in this folder.

- After deleting these files, close the spool folder.
- Go back to the Services window. Right click on the Print Spooler service and select Start.

Now attempt a test print to check if it brings your printer back to normal state.
Solution 4: Disable Use Printer Offline Option to Remove Canon Printer Not Printing
“When your Canon printer refuses to print, you can resolve this issue by disabling the ‘Use Printer Offline’ option to restore it to online printing status.”
This procedure is only 7 steps long.
- Press the “Start” button of your system’s keyboard and then click on “Control Panel”.

- Find and click on “Hardware and Sound”.
- The next step is to click on “Devices and Printers”.

- Now, right-click on your Canon printer and choose the option of “See what’s printing”.

- After this, click on “Printer”. In the drop-down menu, you will find the option of “Use printer offline”. Uncheck it.

- Then click on “Cancel all documents”.

- Now reconnect your Canon printer and give a print command to ensure that the Canon printer not printing color error has been fixed.
Solution 5: Update Printer Driver
“Updating the printer driver has proven effective in troubleshooting ‘Canon Printer is not Printing’ issues. Therefore, in this solution, we will guide you through six steps to update the Canon printer driver.”
- Search for Device Manager and open the application.

- Then, go to the “Device Manager” and open the sub-menu “Print queues”.

- Right-click on the printer and then select the option “Update driver”.

- You will be prompted with the question “How do you want to search for drivers?” Select the option “Browse my computer for driver software” to continue.
- After the Canon printer driver has been updated, you have to reboot your system.
Solution 6: Turn off or disable the security software
- Click on the Windows logo icon and type “Control Panel” in the search field.

- Select Control Panel from the search results.
- Choose System and Security.

- Click on Windows Defender Firewall.

- Select the option “Turn Windows Defender Firewall on or off.”

- Click on the “Turn off Windows Defender Firewall (not recommended)” radio buttons under both Private network settings and Public network settings. Then click OK.

Try this troubleshooting solution to fix if you printer not printing correctly else move to next solution.
Solution 7: Turn off or disable the security software
Basic Troubleshooting Check to Fix Canon Printer not Printing Black and White Color
Solution 1: Check your ink levels
“The initial step to resolve the issue of your printer not printing in black color is to verify your ink levels. You can perform this step in two different ways.”
- Go in front of your printer screen and click on the icon that looks like a teardrop. Most printers available today have this icon on top or at the bottom of their printer display screen.
- Check Ink Levels Icon or the Teardrop Icon
- Another way is by opening your printer software on your desktop screen, it usually has your printer icon and name. Once that program’s open, select the option that says “Check ink levels“.
- The ink levels that you’re going to see here might not be that accurate to the actual ink levels inside your ink cartridges, but it still provides you with a good estimate of how much ink you have.
- If it’s more than a quarter full, then you should be fine.
- If it’s less than a quarter full, then you should change your ink cartridge to see if it can help fix your printer issue.
Solution 2: Change your Toner ink cartridges
Once you’ve identified the amount of ink on each of your cartridges, it’s now time to change those with low ink levels.
- Lift open the top cover of the printer.

- Take out the toner cartridge from the printer.

- Hold the toner cartridge as depicted in the figure and gently shake it 5 or 6 times to evenly distribute the toner inside the cartridge.

- Ensure to securely hold the toner cartridge as illustrated in the figure.

- Reinstall the toner cartridge back into its place.

- Close the top cover of the printer.
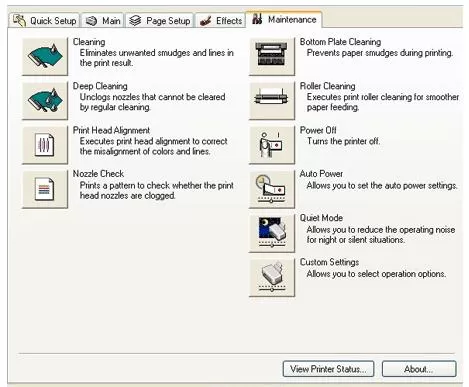
Solution 3. Execute print head cleaning.
- Press the Setup button, then press the + button to display [2] on the LCD (Liquid Crystal Display).
- Press the Black button or Color button.
- Print head cleaning starts. Cleaning takes about 1 minute.
- When the print head cleaning is complete, the ON lamp stops flashing and stays lit.
- Check for improvement.
- Print the nozzle check pattern again.
- Check the printed nozzle check pattern.
- if improved, cleaning is not required.
- If not improved sufficiently, additional cleaning is required.
- if not improved even after cleaning two more times, perform deep cleaning.
Solution 4. Execute print head deep cleaning (From Printer)
- Power on the printer.
- Ensure there are 5 or more A4 size papers loaded in the tray.
- Open both the paper output tray (B) and the output tray extension (A).

- Initiate the cleaning process by selecting ‘Setup’ on the printer’s panel. To select setup, press the tools/wrench icon.
- Use the arrow keys to navigate and select the ‘Maintenance Menu G0070718,’ then press OK to enter.

- Choose ‘Deep Cleaning’ and press the OK button.

- Confirm your selection by choosing ‘YES’ and then pressing OK. This will start the cleaning process; please wait for approximately 3 minutes until it completes.
- After the confirmation of the pattern print appears on the screen, press OK.
Solution 5. Execute print head deep cleaning from Computer
You can use the following measures to resolve this issue of your printer not printing black pages.
- On your desktop screen open My computer < Control panel < Devices and printers.

- Right click on your printer’s name and choose properties.

- Inside your printer’s properties, check device settings and click on preferences.
- Under the preferences option, click on services and choose clean printhead.

- You might need to use this option several times before the printhead is cleaned completely.
Solution 6. Align the Cartridge
Once you’ve replaced the defective cartridge, it’s crucial to align it properly. Failure to do so might result in a Canon printer not printing black color.
Follow these steps:
- Turn on the printer and load paper into the input tray.
- Press the ‘Next’ button to access the ‘Setup’ section.
- Navigate using the right arrow button.
- Access ‘Tools.’
- Press ‘OK.’
- Continue pressing the correct right arrow button until the ‘Align Printer’ option appears.
- Click ‘OK.’
- The printer will generate an alignment page.
- Allow the printer to scan the sheet and complete the alignment process.
Facing issues with a Canon printer not printing or encountering black color problems can disrupt workflow and productivity. However, by following these Canon printer troubleshooting steps, you can often resolve these issues without extensive technical expertise.
I am Komal Hatwaani, aims to provide readers with informative and engaging content that covers everything from technology and business to entertainment and lifestyle. This website dedicated to delivering high-quality content that informs, entertains, and inspires our readers.
Join us on our journey as we continue to explore the ever-evolving landscape of news and information, providing you with valuable insights and perspectives that enrich your digital experience.


