Encountering issues with the Windows Update service not running can be frustrating, especially when you’re trying to keep your system up-to-date and secure. However, fear not! In this guide, we’ll walk you through the process of resolving this common problem efficiently and effectively. Whether you’re using Windows 11 or Windows 10, we’ve got you covered with step-by-step solutions
Follow These Method to Fix Windows Update Service Not Running/Working or Not Showing
Method 1: Run Windows Update troubleshooter
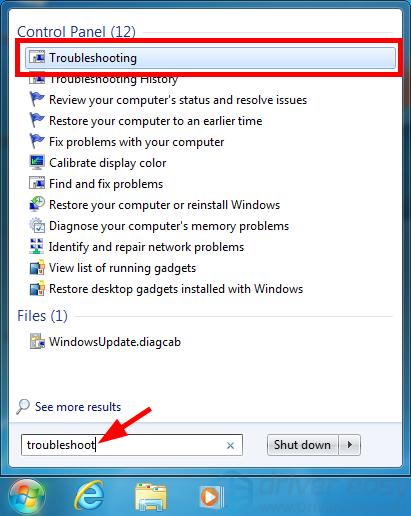
- To begin, click on the Start button located in the lower left corner of your screen. Then, type “troubleshoot” in the search bar and select “Troubleshooting” from the search results.

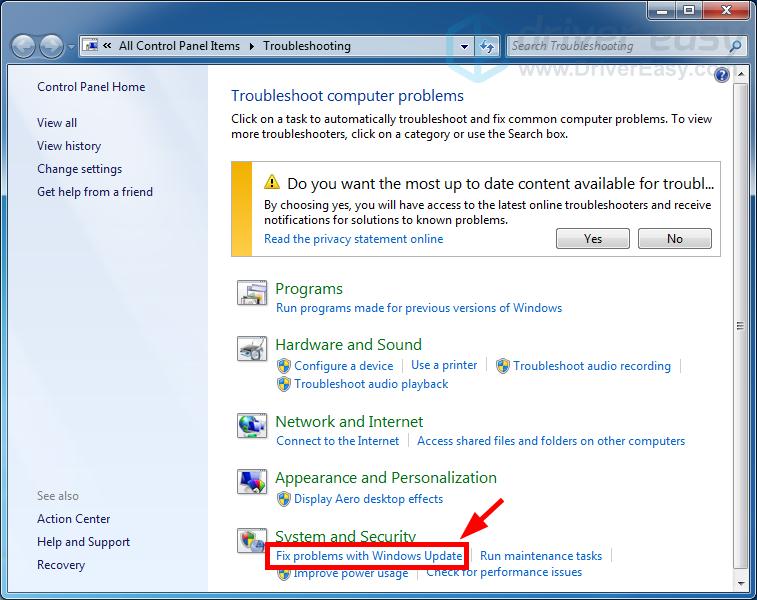
- Select “Fix problems with Windows Update.”

- Proceed by following the instructions provided on your screen to finish the troubleshooting process.

- Try running your Windows Update again to check if the issue has been resolved.
Method 2 Restart the Windows update service
- Press the Windows key + R to open the Run window.
- Type the command “services.msc” and press Enter to open the Service Manager.

- Within the list, arranged alphabetically, find the Windows Update service. Right-click on it and select “Restart” from the options.
- Change the Startup type to “Automatic” and click on Apply. Then, set the Service status to “Running.”

- Click on OK to save the changes.
- Reboot the system and check if it helps.
- Else go to the next method if Windows Update Service Not Running or working.
Method 3: Clear the Software Distribution folder
The SoftwareDistribution folder holds temporary files for Windows Update. If you encounter errors, they might be due to corruption within these files. To check if these files are the root cause, consider deleting all the content within this folder.
- Press the Windows logo key and R simultaneously on your keyboard to open the Run dialog box.
- Enter “services.msc” into the Run dialog box, then click on OK to open the Services snap-in.
- Click on Windows Update, then select Stop to Stop the service.

- Open File Explorer (press the Windows logo key and E simultaneously on your keyboard), then navigate to C:\Windows\SoftwareDistribution and delete all the files and folders located there.

- Reopen the Services snap-in. After that, select Windows Update and then click on Start to activate the service.

- Restart your computer, and then run Windows Update to check if this resolves the issue with the “Windows Update service not running” error.
Method 4. Perform an SFC (System File Checker) scan and utilize the DISM (Deployment Image Servicing and Management) tool.
Execute an SFC (System File Checker) scan:
- Open an elevated Windows PowerShell console.
- Enter the following command:
sfc /scannow

- Press Enter.
Perform a DISM (Deployment Image Servicing and Management) scan:
- Open an elevated Windows PowerShell console.
- Enter the following command and press Enter: DISM /Online /Cleanup-Image /CheckHealth

- If the DISM tool detects any issues, execute the following two commands:
DISM /Online /Cleanup-Image /ScanHealth
DISM /Online /Cleanup-Image /RestoreHealth
Method 5: Manually update Windows 10
You have the option to download and install the most recent updates for Windows 10 manually from the Microsoft Update Catalog website instead of relying on Windows Update. This approach might aid in resolving the service issue for future updates.
- Press Windows + R to open the Run box.
- Type “winver” and click OK.
- Make a note of your Windows 10 version (e.g., 21H1).

- Go to the Windows 10 update history website and record the latest KB (Knowledge Base) ID for your Windows 10 version.

- Navigate to the Microsoft Update Catalog website and search for the KB ID.

- Choose and download the most recent update compatible with your Windows 10 version.

- Run the downloaded installer to apply the update.
- Still if your Windows Update Service Not Running properly go ahead for next method
Method 6. Restore invalid/missing registry keys from a working system.
1. Open Registry Editor: To do that:
- Simultaneously press “Windows” + “R” keys to open the RUN window.
- In “RUN” window “Open” box, type: regedit
- Press Enter
2. At the left pane, press the “+” sign and navigate to this subfolder:
- HKEY_LOCAL_MACHINE\SYSTEM\CurrentControlSet\services\BITS
3. Right-click on BITS subfolder and select Export.
4. Give a name for the exported file (e.g. ‘BITS‘) and save it to the desktop.
5. Then navigate to this subfolder:
- HKEY_LOCAL_MACHINE\SYSTEM\CurrentControlSet\services\wuauserv
6. Right-click on wuauserv subfolder and select Export.
7. Give a name for the exported file (e.g. ‘wuauserv‘) and save it to the desktop.
8. Close registry
9. Copy the exported registry files to a USB flash drive.
On the computer that Windows Update service or BITS Service is missing (not listed).
1. Plug the USB flash drive with the exported reg files to an empty USB port.
2. Double click at the exported BITS registry file (e.g. “BITS.reg) and allow to add its information to registry. *
3. Double click at the exported wuauserv registry file (e.g.”wuauserv‘.reg “) and allow to add its information to registry.
4. Restart the computer.
5. Check if Windows Update is working.
Method 7.Disk Clean-up
- Step 1: Right-click the Windows 10 Start menu and select Run. Type “diskmgmt.msc” in the box, then click OK or press Enter to proceed.

- Step 2: Access the Disk Management main interface. Right-click on the system drive and choose Properties from the context menu.

- Step 3: A popup window will appear. Click on Disk Cleanup to proceed.

- Step 4: Disk Cleanup will take a few minutes to calculate the free space, depending on the volume of files on the disk. Select the files you want to delete and click OK to continue.

- Step 5: A confirmation message will appear asking, “Are you sure you want to permanently delete these files?” Click on Delete Files to continue. This will complete the Disk Cleanup process.

Method 8. Uninstall third-party security software
Step 1: Right-click on the Start menu, then select Control Panel.
Step 2: Click on Programs and Features, locate the third-party software you wish to uninstall, right-click on it, and select Uninstall to proceed. Following this, restart your computer and check if the problem of Windows 10 update persists.
Conclusion
In addressing the ‘Windows Update Service Not Running’ issue, it’s crucial to consider various troubleshooting steps. From utilizing built-in tools like SFC and DISM scans to manually updating Windows via the Microsoft Update Catalog, users can attempt several methods to resolve this issue.
I am Komal Hatwaani, aims to provide readers with informative and engaging content that covers everything from technology and business to entertainment and lifestyle. This website dedicated to delivering high-quality content that informs, entertains, and inspires our readers.
Join us on our journey as we continue to explore the ever-evolving landscape of news and information, providing you with valuable insights and perspectives that enrich your digital experience.


